
 Canada EN
 Mexico ES
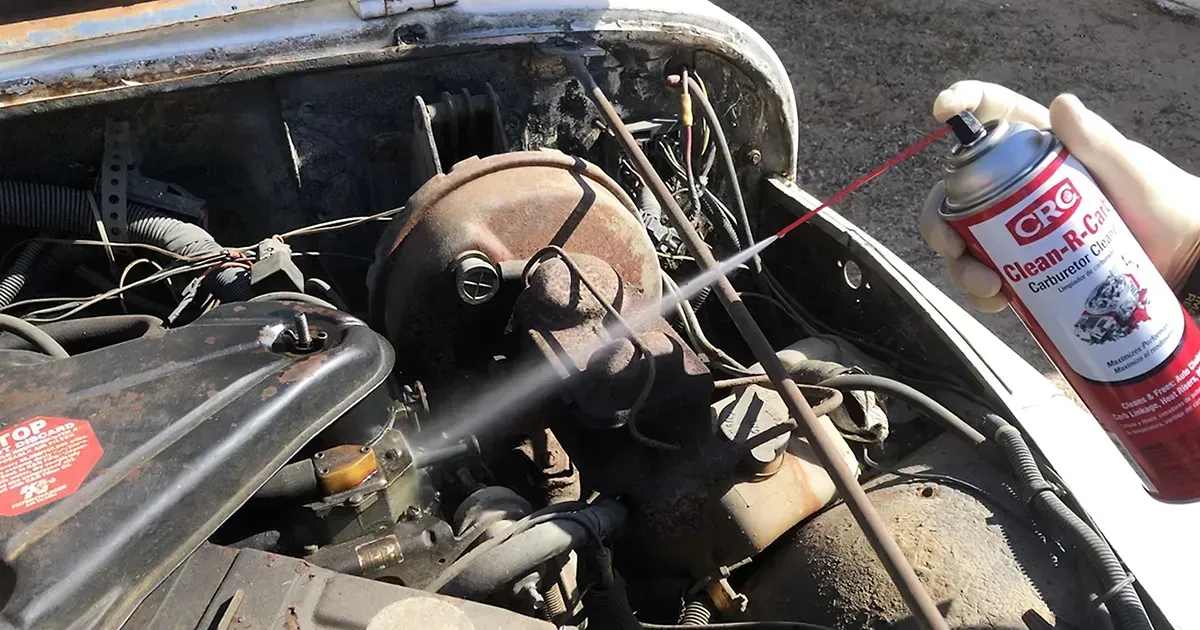
Table of Contents:
What Does a Carburetor Do? | The Benefits of Cleaning | When You Need to Clean | Best Carburetor Cleaner? | Tools Needed | How to Clean a Carburetor for a Car | How to Clean a Carburetor Without Removing It | How to Clean a Lawnmower Carburetor | How to Clean a Motorcycle Carburetor | How Often | A Summary
How to Clean a Carburetor
Quick Guide
- Remove the carburetor from the engine.
- Soak the carburetor in a cleaner solution.
- Use a soft-bristled brush to clean all parts.
- Rinse and dry the carburetor.
- Reassemble the carburetor.
- Reinstall the carburetor on the engine.
What Does a Carburetor Do?
A carburetor is an essential part of the fuel system in many internal combustion engines. This includes those found in cars, motorcycles, small aircraft, as well as small engines used for generators and yard maintenance tools. The carburetor's primary function is to properly mix fuel and air, which is then sent to the engine for combustion.
Air is drawn into the engine through the carburetor and funneled through a cone-shaped tube (called a venturi) that speeds up the airflow. The increased airflow causes a drop in air pressure that pulls fuel from the carburetor's fuel bowl into the venturi. The fuel and air combine in the venturi and then enter the combustion chamber, where the mixture is ignited to produce power.
The carburetor also controls the engine's idle speed and regulates the amount of fuel and air sent to the engine, based on factors like engine speed, load, and throttle position.
Most modern cars have switched to electronic fuel injection systems, but carburetors are still found in some small engines and vintage vehicles. Understanding how the carburetor works is essential for maintaining and troubleshooting them.
Benefits of a Clean Carburetor
A clean carburetor is important for several reasons. Most importantly:
- Improved Performance: A dirty carburetor can cause a variety of performance problems, including reduced power, poor acceleration, and stalling. Keeping your carburetor clean allows fuel and air to mix properly, ensuring optimal performance.
- Better Fuel Efficiency: Many factors can impact fuel efficiency, including a dirty carburetor. A poorly maintained carburetor can restrict airflow, causing the engine to burn more fuel than necessary. This reduces fuel efficiency and increases operating costs. A clean carburetor provides the proper mix of fuel and air, allowing the engine to burn fuel efficiently.
- Longer Engine Life: A dirty carburetor can cause excessive wear and tear on engine components, potentially resulting in premature engine failure. A clean, well-maintained carburetor will help keep your engine running as long as possible.
- Reduced Emissions: A dirty carburetor can also contribute to increased emissions. Keeping the carburetor clean and functioning correctly reduces your vehicle's emissions, so you can do your part to protect the environment.

How to Know When You Need to Clean a Carburetor
Several signs may indicate that you need to clean your carburetor. These can vary depending on the severity of the problem. Some of the most common symptoms include:
- Difficulty Starting: A dirty carburetor can prevent the proper air-to-fuel mixture needed to ignite in the combustion chamber. This can cause the engine to take longer than normal to crank over or even fail to start.
- Rough Idling: A dirty carburetor can cause your engine to idle roughly or erratically. You may notice vibrations, stalling, and potential engine damage.
- Reduced Power: A poorly maintained carburetor can restrict fuel and airflow to your engine. This results in a noticeable reduction in power and performance.
- Stalling: A dirty carburetor can cause your engine to stall, particularly when idling or at low speeds.
- Poor Fuel Economy: A clogged or dirty carburetor can cause your engine to use more fuel than necessary, leading to reduced fuel efficiency and increased costs.
What Makes the Best Carburetor Cleaner?

A carburetor cleaner should effectively remove the dirt and grime that builds up inside the carburetor and other engine components. Here’s what to look for when shopping for a quality carburetor cleaner:
- Fast-acting: The best carburetor cleaners work quickly to dissolve and remove deposits, allowing you to clean the carburetor and other engine components easily.
- Safe for Carburetor Components: The best carburetor cleaner should be safe for use on any components related to the carburetor, including rubber, plastic, and unpainted metal. It should not damage or corrode these materials.
- Easy to Use: The best carburetor cleaners are easy to apply. Ideally, they should come with a spray nozzle or other applicator, allowing you to distribute the cleaner directly to the affected areas.
CRC Clean-R-Carb™ Carburetor Cleaner is an advanced carburetor cleaner specifically formulated to deliver fast-acting, powerful cleaning. It effectively dissolves dirt, grime, and buildup, ensuring optimal engine performance and fuel efficiency. It is also available in a low VOC formula - CRC® Clean-R-Carb™ Carburetor Cleaner (50 State Formula).
Tools to Clean a Carburetor
The tools needed to clean a carburetor can vary depending on its make and model, but some basic tools you may need include:
- Screwdrivers: You will need screwdrivers to remove the screws that hold the carburetor in place. Once removed, you'll need them to disassemble it.
- Wrenches: You may need a set of wrenches to remove any nuts or bolts holding the carburetor in place.
- Wire Brushes: Wire brushes are great for scrubbing away any buildup or debris inside the carburetor.
- Compressed Air: Compressed air is effective for blowing out any debris and contaminants from the carburetor's small passages and jets.
- Safety Goggles and Gloves: When working with carburetor cleaner and other chemicals, it's important to wear safety goggles and gloves to protect your eyes and skin.
- Clean Work Area: It's important to have a clean work area to disassemble and clean the carburetor. Depending on the carburetor's configuration, you may need additional tools, such as pliers, a socket set, or a carburetor rebuild kit.

How to Clean a Carburetor for a Car
- Remove the carburetor from the engine.
Disassemble the carburetor, noting the location of each part for reassembly. - Soak the carburetor in a cleaner solution.
Follow the time recommended in the product’s instructions. - Use a soft-bristled brush to clean all parts.
Clean the jets, float bowl, and throttle body. - Rinse and dry the carburetor.
Rinse thoroughly with clean water, then blow out all passages with compressed air. - Reassemble the carburetor.
Install all parts in their correct locations. - Reinstall the carburetor on the engine.
Adjust as necessary.
**Note additional steps or tools required**
Some carburetors may have additional steps and may require special tools for cleaning. Be sure to consult the manufacturer's instructions or speak with a trusted mechanic if you’re unsure of the proper procedure.
How to Clean a Carburetor Without Removing it from the Vehicle
In some situations, you can clean the carburetor without removing it from the vehicle. If there aren’t any severe issues with the carburetor, then the following steps can be followed to clean it while still on the vehicle:
Tools and Materials Needed
- Carburetor cleaner spray: CRC Clean-R-Carb™ Carburetor Cleaner is specifically formulated to deliver fast-acting, powerful cleaning for your carburetor. It is also available in a low VOC formula - CRC® Clean-R-Carb™ Carburetor Cleaner (50 State Formula)..
- A small brush (like a toothbrush).
- Screwdriver or small tools (if minor disassembly is needed).
- Safety gear (gloves, safety glasses).
Step-by-Step Guide
1. Preparation
- Turn off the engine: Make sure the vehicle is off, and the engine is cool.
- Access the carburetor: Open the hood and locate the carburetor. You may need to remove the air filter housing for better access.
2. Inspect the Carburetor
- Check for visible dirt, grease or residue. Note areas where buildup is prominent.
3. Clean the Outside
- Spray the carburetor cleaner on the external parts to dissolve grease and dirt.
- Use a brush to scrub off stubborn debris.
4. Spray Cleaner into the Carburetor Throat
- Start the engine and let it idle. This allows the cleaner to flow through the carburetor system.
- While the engine is running, spray the cleaner directly into the carburetor throat (where air enters). Use short bursts to avoid stalling the engine.
- Rev the engine slightly to help suck the cleaner through the passages.
5. Focus on Key Components
- Throttle plate: Spray cleaner around the throttle plate and its linkage. Open and close the throttle manually to clean behind it.
- Idle jet or mixture screw areas: Apply cleaner to the areas where fuel mixes with air, as dirt often clogs these passages.
6. Final Rinse
- With the engine off, give the carburetor a final spray to remove any loosened residue. Allow it to dry completely.
7. Reassemble and Test
- Replace the air filter housing.
- Start the engine and test its performance. Listen for smoother idling or improved throttle response.
Tips for Success
- Use the carburetor cleaner sparingly to avoid damaging seals or components.
- Avoid spraying too much cleaner into electrical connections near the carburetor.
- If problems persist after cleaning, a full disassembly might be necessary.
How to Clean a Lawnmower Carburetor

Now that you’ve got a good idea of how and why to keep your vehicle’s carburetor clean, that same logic can be applied to other engines around your house. Keeping your lawnmower in good working condition ensures a smooth and efficient mowing experience. One of the most common issues affecting lawnmower performance is a dirty or clogged carburetor. Cleaning the carburetor can often resolve problems like difficulty starting, sputtering or reduced power.
Why Clean a LawnMower Carburetor?
The carburetor is a crucial component of your lawnmower, mixing air and fuel in the correct proportions for combustion. Over time, dirt, debris, and old fuel can clog its tiny jets and passages, leading to performance issues. Regular cleaning prevents costly repairs and keeps your lawnmower running smoothly.
Tools and Materials Needed to Clean a Lawnmower Carburetor
- Socket wrench or screwdriver (depending on the lawnmower model)
- Lawnmower Carburetor cleaner spray: CRC Clean-R-Carb™ Carburetor Cleaner is a great choice, even for your lawnmower. It is also available in a low VOC formula - CRC® Clean-R-Carb™ Carburetor Cleaner (50 State Formula)..
- Small wire brush or toothbrush
- Compressed air (optional)
- Needle or thin wire
- Clean rags
- A container for catching fuel
- New gaskets, if needed
- Gloves and safety goggles
How to Clean a Carburetor on a Lawnmower
Step 1: Preparation
- Turn Off the Lawnmower: Ensure the lawnmower is off and disconnect the spark plug wire to avoid accidental starts.
- Empty the Fuel Tank: Drain any remaining fuel into a container to prevent spills during disassembly.
- Locate the Carburetor: Typically, the carburetor is near the air filter on the side of the engine. Consult your lawnmower's manual if you're unsure.
Step 2: Remove the Carburetor from the Lawn Mower
- Detach the Air Filter Housing: Use a screwdriver to remove the housing and set it aside.
- Disconnect the Linkages: Carefully unhook the throttle and choke linkages attached to the carburetor.
- Unscrew the Carburetor: Using a socket wrench or screwdriver, remove the bolts securing the carburetor to the engine.
Step 3: Disassemble the Lawn Mower Carburetor
- Remove the Bowl: Unscrew the carburetor bowl (usually located at the bottom) to access the interior components.
- Inspect for Debris: Look for dirt, varnish or fuel residue inside the bowl and other parts.
Step 4: Clean the Lawn Mower Carburetor
- Spray Carburetor Cleaner: Apply the cleaner to all visible parts, focusing on jets, needles, and small passages.
- Clear Clogs: Use a needle or thin wire to remove debris from the jets and tiny holes.
- Brush Away Build-Up: Use a small wire brush or toothbrush to scrub off stubborn grime.
- Blow with Compressed Air: If available, use compressed air to ensure all passages are clear.
- Wipe Down: Clean the parts with a rag and let them dry thoroughly.
Step 5: Reassemble the Carburetor
- Replace the Bowl: Securely reattach the carburetor bowl, replacing gaskets as necessary.
- Reconnect Linkages: Hook the throttle and choke linkages back into place.
- Reinstall the Carburetor: Bolt the carburetor back onto the engine and ensure it's tightly secured.
- Reattach the Air Filter Housing: Fix the air filter housing back in place.
Step 6: Test the Lawnmower
- Refuel and Reconnect: Add fresh fuel to the tank and reconnect the spark plug wire.
- Start the Engine: Start the lawnmower to check if it runs smoothly.
- Monitor Performance: If the engine still sputters or fails to start, the carburetor may need a more thorough cleaning or replacement.
Lawn Mower Carburetor Maintenance Tips
- Use Fresh Fuel: Old fuel can leave residues that clog the carburetor.
- Clean Regularly: Periodic carburetor cleaning prevents buildup and prolongs engine life.
- Inspect the Air Filter: A dirty air filter can also affect carburetor performance; clean or replace it as needed.
How to Clean a Motorcycle Carburetor

The carburetor is a critical component of your motorcycle’s engine, responsible for mixing air and fuel to ensure proper combustion. Over time, dirt, debris, and fuel residue can clog the carburetor, leading to performance issues like hard starting, rough idling, and reduced power. Regular cleaning can keep your motorcycle running smoothly. Here’s a detailed guide to help you clean a motorcycle carburetor effectively.
Why Clean a Motorcycle Carburetor?
A clean carburetor ensures smooth acceleration and consistent idling for better performance. A clean carburetor can also improve fuel efficiency by removing clogs to allow the engine to operate at its optimal air-fuel ratio.
Tools and Materials Needed to Clean a Motorcycle Carburetor
- Motorcycle Carburetor cleaner spray: CRC Clean-R-Carb™ Carburetor Cleaner is a great choice, even for your motorcycle. It is also available in a low VOC formula - CRC® Clean-R-Carb™ Carburetor Cleaner (50 State Formula)..
- Screwdrivers (flathead and Phillips)
- Wrenches or sockets
- Needle or thin wire (for clearing jets)
- Small brush (e.g., toothbrush)
- Clean rags or paper towels
- Compressed air (optional but recommended)
- New gaskets, if needed
- Safety gloves and glasses
How to Clean a Motorcycle Carburetor
1. Prepare Your Workspace
- Park your motorcycle on a level surface and turn off the engine.
- Disconnect the battery to avoid accidental electrical contact.
- Shut off the fuel supply by turning the petcock to the "Off" position.
2. Access the Motorcycle's Carburetor
- Remove the seat and fuel tank if necessary to expose the carburetor.
- Disconnect the throttle and choke cables, vacuum hoses and fuel lines. Label them for easy reassembly.
- Loosen the clamps securing the carburetor to the airbox and engine manifold. Carefully slide it out.
3. Disassemble the Motorcycle Carburetor
- Place the carburetor on a clean surface.
- Remove the float bowl (the bottom part) by unscrewing its bolts.
- Take out the float, needle valve, jets (main and pilot) and any other removable parts. Keep a diagram or take photos to aid in reassembly.
4. Clean the Motorcycle Carburetor Components
- Jets and Passages:
- Spray carburetor cleaner into the main jet, pilot jet and all passages.
- Use a thin wire or needle to clear stubborn blockages. Ensure the jets are fully unclogged by checking light through the holes.
- Float Bowl:
- Spray the inside of the float bowl to remove gunk and deposits. Scrub with a small brush if necessary.
- Carburetor Body:
- Spray cleaner into all openings, paying attention to the throttle and choke areas.
- Use compressed air to blow out debris and ensure clear passages.
- Inspect Seals and Gaskets:
- Check for damage or wear on gaskets and O-rings. Replace any that appear cracked or brittle.
5. Reassemble the Motorcycle Carburetor
- Reinstall the cleaned jets, needle valve and float.
- Reattach the float bowl and tighten the screws evenly to prevent leaks.
6. Reinstall the Motorcycle Carburetor
- Slide the carburetor back into place, ensuring a snug fit with the airbox and manifold.
- Reconnect all cables, hoses and clamps.
- Reattach the fuel line and confirm there are no loose connections.
7. Test Your Work
- Reconnect the battery and turn on the fuel supply.
- Start the engine and let it idle. Check for smooth performance and adjust the idle screw if necessary.
- Test ride your motorcycle to ensure proper throttle response and acceleration.
Tips for Your Motorcycle Carburetor Maintenance
- Clean Regularly: Depending on your riding conditions, clean the carburetor every 6–12 months.
- Use Fresh Fuel: Stale or dirty fuel is a common cause of carburetor clogs.
- Fuel Stabilizer: Use a stabilizer if the motorcycle will be stored for an extended period.
- Replace Filters: Check and replace fuel and air filters to prevent debris from entering the carburetor.
How Often Should You Clean a Carburetor?
The frequency of cleaning your carburetor depends on several factors, including how often you use your vehicle, the environmental conditions where you drive, and the type of fuel you use. As a general guideline, you should clean your carburetor at least once a year or every 12,000 to 15,000 miles, whichever comes first. However, if you notice any of the symptoms mentioned earlier, it may be necessary to clean the carburetor more frequently.
How to Clean a Carburetor - A Summary
A clean carburetor is essential for maintaining optimal engine performance, fuel efficiency, and longevity. Regular maintenance helps avoid common issues, ensuring your engine runs smoothly and efficiently. By prioritizing carburetor cleanliness, you can:
- Enjoy better performance
- Save on fuel costs
- Reduce the likelihood of costly repairs
Whether you’re driving a classic car, riding a motorcycle, or mowing your lawn, keeping your carburetor clean is a small task that yields significant benefits.